Replace a Lamp Socket
When it comes to old light fixtures, repairing rather than replacing is always a good option.
Replacing a lamp socket assembly is an easy way to extend the life of an old light fixture.
Step 1: Make sure the lamp is unplugged, or the power supply has been shut off.
Step 2: Remove the light bulb and disassemble the metal socket. Typically, the top of the brass shell can be pulled apart from the bottom of the shell. Use a flat head screw driver to pry the two pieces apart if necessary.
Step 3: Loosen the terminal screws on either side of the aluminum socket. Remove the wires from both screws. If the wires are tied in a knot, untie the knot and straighten the wires. Loosen the set screw on the stem of the outer shell, unscrew the outer shell from the lamp nipple and slip the bottom of the shell up and off the wires.
Step 4: Pull the ends of the wire apart leaving about three inches of wire free on each side. Cut off the frayed ends and use a knife or wire stripper to expose one half inch of bare wire. Twist the wire ends tightly, to create two separate probes of exposed wire.
Step 5: Slip the newly exposed wire ends through the bottom of the new shell and screw the shell onto the lamp nipple. Secure the bottom of the shell in place by tightening its set screw.
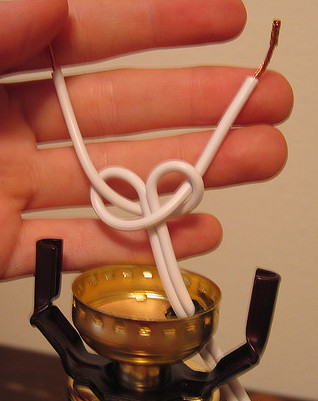
Step 6: Secure the wire into place by tying it into an underwriters knot. Form two loops, much like butterfly wings, with each wire end. One wire should be looped behind the undivided portion of the wire and the other looped in front of it. Feed the tips of the wire through their opposing loops and pull tightly to secure the wires.

Step 7: Wrap the wire ends clockwise onto the terminal screws of the new lamp socket. As you tighten the screws the wire should be pulled neatly under the screw head.
Step 8: Make sure the terminal screws are tight and there are no loose wires sticking out. Slip the cardboard insulator over the aluminum shell and slide the outer shell over it.
Step 9: Snap the outer shell into place, screw in the light bulb and turn the power back on.
If all is well, you should have a safe, working light fixture for many years to come.